Thursday, March 26, 2009

KITTEHS!!!

OK so while I wait for certain projects to near completion, here's a kitty interlude! Here's my two cats, Jasmine and Charlie. Jasmine is 8 years old, and Charlie is 3. Jasmine is a lap-addicted cat, and Charlie just HAS to get into everything. I swear Charlie thinks he's a dog. He follows you around everywhere, he doesn't meow like normal cats do he makes this... I dunno sort of a cooing sound. He's also the clumsiest damn cat I've ever seen! He will fall out of windowsills pretty consistantly, whereas Jasmine is lithe and nimble, even for her age.

Jasmine looooves this window. She watches the birdies nesting next door.


Yea catfight! The kitties love chasing each other around the house.


Her Highness demands placation.

The cats aren't spoiled at all. Not one bit.


He fell off the back of the chair shortly after this picture was taken.


Charlie you look uncomfortable.


Charlie knows what's best in life, he's guarding the beers. There's a Kona Fire Pale Ale clone on the left, and in the homemade carboy cozy is some 777 Rye PA


And here's my other babies. These are the only pictures I have of Candice and Sam in my new place. They were only here once, before being taken to Utah. At least.... at least they saw their new rooms that I got for them before


Excuse me there's something in my eye.....

Friday, March 20, 2009

Finally the rooms that we set out to paint are finally done being painted. Me and Tamara did the living room and office a few weeks ago, and while Gabe was out here visiting we put him to work painting the kitchen and bathroom. Yes, he enjoyed himself. Why yes, we have strange notions of vacationing in my family, why do you ask? He did painting for a summer and is good at it, OK? OK.

Tamara and Mom were the ones to pick out the colors, since I am aesthetically colorblind. That is, I can see colors fine, but I have no clue as to what looks good in a room or not. I'd end up painting everything black or pumpkin orange or some crap like that.
The first room to be painted was the living room.

The color on the left is the new color, the one on the right is the craptastic old beige color. Yea. I hate beige. Depending on the light, it looks grey to a light purple. I think it looks welcoming for being in the living room.

Jasmine was quite stressed during the painting ordeal. It didn't help when she wiped her tail through fresh paint, then took off and hid when I tried to grab her to get rid of the paint.... I got rid of most of it, but there's still remnants of paint in her tail. She refused to be photographed for the tail paint photo.

Here's the new office color. I really love the colors of the walls. The forest green really puts me at ease. For some reason it looks lighter in this picture, it's actually a shade darker. Yes, I did paint up near the ceiling to finish off the walls.


Here's the new kitchen color. I think it gives off almost a kind of mexican vibe, with the contrasting color with the cabinets. Gabe and Tamara did a great job at painting it while I was in the bathroom putting up a sheet of drywall that itched something awful, and patched up a bunch of holes that needed to be done.

While we were prepping and painting the bathroom, I noticed something, and now I can't unnotice it.


Wait for it....


Yes, it looks just like 7 eleven nacho cheese! Just. Like it. So I tried some.

No, there are no pics of me barfing it back up, so don't ask.

So that's all for painting for now. I'm not sure what color I'm going to paint the upstairs bedroom yet. I'm debating on using the leftover paint from the living room and lightening it up a bit to use up there, I think it may look nice. Then again painting the walls black would look OK to me too. So I will have no input as to what color the upstairs will be, I'll leave that to more capable hands.

Wednesday, March 18, 2009

I am the chick fil Ayeeee!

Ever since I got the house Tamara has been wanting chickens. Since spring is upon us and we now have time to take care of chicks, we went downtown to pick up some chicks and bring em home. Ohhh yea. A few weeks ago we found out that we can have up to six chickens within city limits without a permit, as long as they're all hens. We have no problem with that, as I would shoot a rooster eventually what with his damn noise.

We picked some babies up on 3/7, and three more on 3/12. They were literally born yesterday. I tried to sell them the new stimulus package and even they still didn't go for it. There's three bantam Americanas ("Easter Egg Chicken"), and two bantam cochins color as of yet unknown, and later I picked up two standard sized New Hampshire Reds. Tamara dotes over them like the newborns they are. It's so cute!!

This is all seven chicks. The red tint is to keep them from pecking at each other. Apparently white light drives them crazy and can turn them to cannibalism. Aren't babies cute?


Om nom nom nom


Here's a better picture of all the chicks. The black ones are the Cochins, the three white ones towards the back are the Americaunas, and the strawberry blonde ones are the standard size New Hampshire Reds. We're pretty certain at this point two of the Americaunas are roosters because they're getting elongated, and have different plumage than the smaller round white one. We're giving them to the feed store in a few weeks.


Here's the two New Hampshire Reds the day I picked them up. They were scared shitless, the poor dears. It was a very traumatic day for them, I'm sure. Charlie was soooo upset I wouldn't let him play with them. Uhm, NO KITTY! Kitties don't play with baby chickens!


This is the blast furnace I designed at first for the chicks to live in. OK not really a blast furnace, but it looks like it, doesn't it? It's a styrofoam cooler I found under the deck with chicken wire over the top and attached with wood and screws. Good thing too because Tamara found both cats sitting on top looking into it! Needless to say we moved the chicks to Tamara's place until they're big enough to fight the cats.


We aren't going to name them until we can tell what sex they are. The 2nd batch I picked up are already sexed, so we know they will be pullets. The first five were not sexed, so we don't know how many, if any, roosters we'll get. We don't want to name all the chickens, only to get a pullet surprise, if you know what I mean. The names we're going to use are Noodle, Nugget, and Patty. I'm also partial to the names General Tso and Charles. I'm not sure about the last one, as Charlie the Cat may take umbrage to Charles Chicken. Maybe I'll use Swee'Ensaur or Kung Pow instead. Yes, I realize these are all food names, but we got them as layers, not meat chickens.

Unless they piss me off.

I have some ideas for the chicken coop and we have some poultry netting, but I want to get some sturdy sheep fencing for the outside to keep the coons out (raccoons are clever). I'm thinking http://www.backyardchickens.com/web/viewblog.php?id=10217-Coop_and_Run is the perfect size and shape, and will line up wonderfully against the back wall of the garage.

Friday, March 13, 2009

My god, it's full of... wasted space.

Here's another project I had to do pretty much immediately as soon as I moved in. The main bathroom had this enormous linen closet (AKA The Monolith) that took up almost one square yard of floorspace. Now, the bathroom isn't exactly tiny, but it's not huge either. This thing went from floor to ceiling and could hold enough linens for a family of 8. Yea no. That's out of here.


You can see here that even from an angle it pokes out and is in the way. It's almost as far out as the toilet! It. has. to. go.


Soon, you will die.


I tried to save as much of the facing off of it as I could, since it's nice finished maple and I might a) need it to fix one of the other cabinets, or 2) use it in some other project. So prying away on the front face was careful work.


Once I got the shelves out though, it was demolition with pure gusto! Please ignore the status of my hair, it's normally like that most of the time.


Here you can see me wondering why the wall doesn't line up. Apparently the bathroom was originally walled in lath and plaster, THEN when the tub was remodeled sometime during the 80's they put drywall over the top of it. I bought a sheet of moisture resistant drywall so I can level things up, I just need to get it cut and installed so we can paint.

Now it's all gone, and you can see all the space that's opened up! Right where my feet are is where the cabinet used to be. Unfortunately, when they put in the cheap tile floor they didn't raise up this monstrosity, so there's two grooves in the tiles where the sides went in. I've not had any luck finding the cheap-ass tiles to tear up and replace, so I may end up redoing the entire floor. If I do, it'll be when I get rid of that horrid 80's style sliding glass door/RV fiberglass shower that's currently there. The next bathroom project was to replace the 1950's Communist era bare bulb light fixture, but I refuse to go into it. It did not go well.

Sunday, March 8, 2009

The stairwell ceiling ..... of DOOM!!

When I moved in, there were a few projects that I saw needed to be done pretty much immediately. One was the ceiling in the stairwell going upstairs to the attic.


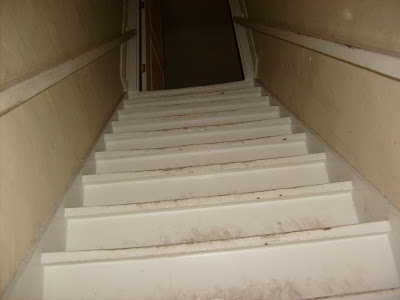
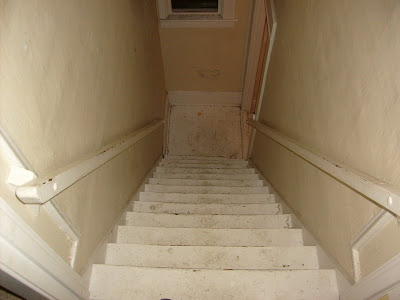
If this looks steep, that's because it is. The stairs are about 7.5" wide, and it looks to be about a 60ยบ incline. Seriously. Here's a view from the top.


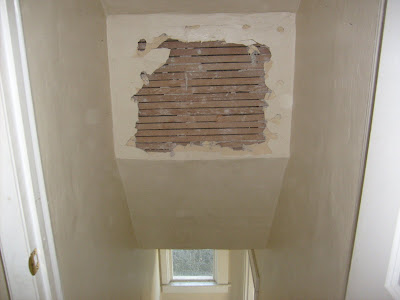
The next shot is the craptastic ceiling that, for some weird reason, the builders wanted to put in so it would be flush with the inaccessible attic space. Yea I don't know what they were thinking either. I had tried to get a bed upstairs, but the movers said there's only 4' 6" of space between the stairs and the ceiling, so it's a no go. They measured it and everything. Grrr..... So no bed, but I did want to take that stupid ceiling out anyways. After much deliberation, I tore a hole through those lath strips and saw the inside. It looked OK to tear down, but I decided to get professional help.


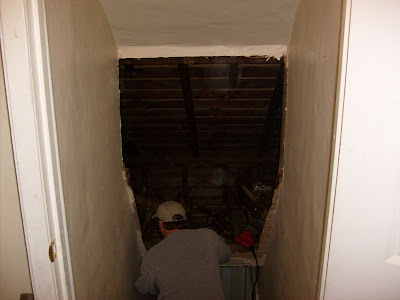
After talking to the therapist, I talked to my step-dad Bob about tearing out the ceiling. Here's Bob about to rip into it.


Mmmm nothing like some good ol' fashioned demolition after a few brewski's, eh? After we looked through the hole in the wall and determined there weren't any live power wires or support beams, out came the power tools! Nothing a sawzall couldn't fix.


mmmmmmmmmmm demolition.... It's dusty work, and we wore our Masks Of Science for safety. Hole crap there's room up here now!


Here I am looking off into the abyss of nothingness aka part of my attic. You can't see it here, but the cthulu of the attic is staring back at me in this photo. Those are actual 2x4s in the photo, BTW. Nowadays 2x4s actually measure 1.5" by 3.5" I don't know why, they just do. There's 2x6s in there too. The ladder I'm on I actually found in the garage in the ceiling, and I think it's original with the house. It's rickety enough, that's for sure!


After the main demolition was done, Bob walled in some 2x4s and a doorway so I can get to that attic space in the future. I'm going to need it for when I want to run some electrical wires, ethernet and cable up there. Yes, that whole wall doesn't have any sort of electricity at all. It's as if when they built the house electricity wasn't even invented yet! Geez.

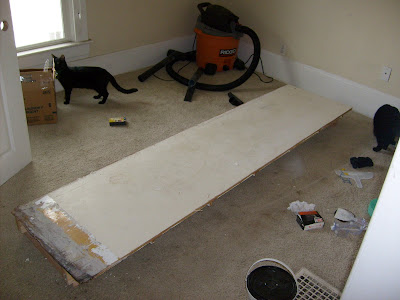
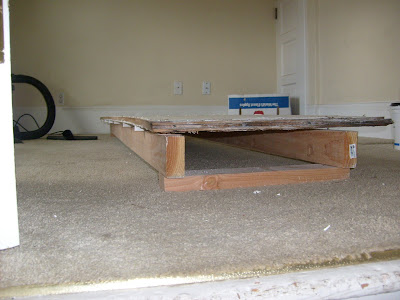
Bob built a neato scaffold that fits up in that space pretty well for working on getting the walls up. It's just 2x4s and plywood from the bathroom demo (more on that later). It works well but holy crap is it frickin heavy!


I have the drywall up and most of the mudding done, but still not painted yet. I have to put up some quarter round on the sides too to make it look all fancy (and not leave holes in the walls).


The delicious irony? Now that I spent all my money on house projects I can no longer afford the bed. D'oh! Plus it may still not make it around that bend in the stairwell anyways. But I think it looks much better than what was there before.

Friday, March 6, 2009

Compost Bin

Since this project is done, AND I have all the pictures I want for it I'll start with the compost bin I constructed for the garden.

I started with 8'x 6" ceder fencing at $1.88 each. I used a single board on the long sides, and cut them 3' long for the short sides. I stacked them 6 high, and since the nominal size is 5.5", the total height is 33". At my height it's perfect for me to be able to lean into the bin to move all the crap around when it needs to be turned.


I used regular 1" fine thread drywall screws to hold it all together. I needed a total of 24 boards, but because I fail math, I bought 23. Oh well. The middle I left an opening so when I drill holes the compost will ventilate. It's not strictly necessary but I feel better about it.


The support posts are 1x2 pine strips. I don't expect these to last more than a few years, but they're easy to replace. If I had more cash I'd have used cedar instead, but I already had them so it's what I used. I screwed the screws in from the inside of the box just because I wanted a clean look on the outside. If you build one like mine, screwing the screws into the support beams from the outside works just fine, but I like doing things the hard way. I'm not going to paint or stain it, although I may end up doing on the outside just for some weatherproofing.

Now it's basically done. I may end up moving it since it's in a spot that'll work for another raised bed. I still need to drill ventilation holes in the sides of it to help keep the moisture down and promote aeration. I'm sure it'll end up being one of my Some Day projects.

Thursday, March 5, 2009

Frist Post!!!

Hello all, and welcome to my blog. This is going to be my semi-updated and never neat and tidy journal about home ownership and renovation. I'm already two months behind and will be slowly filling in all the projects I've done so far. Enjoy!